
Akea Animated Battle System 2
By Raizen

Script Location
https://raizen884.itch.io/akea-animated-battle-system-2
Demo Location
https://holder-anibat.itch.io/holder-aab-demonstration
Author notes
This is the Akea Animated Battle System 2 for MZ!
A video talks all by itself, check out the video of the battle running, This battle system gives TOTAL freedom to the gameDev to work how he wants.
“Easy enough for a child, powerful enough for a developer!”
Make beautiful battles with Akea, without a SINGLE programming knowledge!
Holders notes
This is now what I personally use to test and reference any creations. At first the basic structure seems overwhelming but the basic concept is like that of pseudo-code (in which you program in basic terminology without actually knowing any programming languages).
Everything in this plug-in lets you alter even the simplest of once fixed functions in RPG Maker, for example with visual equipment you can have each individual weapon act completely different on the battle field via the standard attack menu command. This means that Fighters and get up close and attack, where Archers and Wizards stay back and use ranged attacks.
Combine that information with the ability to create combos that use a variation of poses and animations to create a truly dynamic battle system which I’ve never seen possible before in RPG Maker.
I went into this plug-in without ever previously used any plug-ins and have no knowledge of programming. So with now understanding how this works I’m going to create a set-up guide so that everyone can use and enjoy this plug-in.
Video Examples:
Setup Guide
Within this guide we’ll be setting up the basic functions of the plug-in to firstly read the format of the sprite sheets that the actors, weapons and enemies will be using. After this is done, in most cases it’s a routine of copying and pasting it for any new additional entities that are included in the future.
Sprite sheet set-up

AkeaAnimatedBattleSystem
Spritesheet Configuration.
Clicking into the Parameter 1 slot you’re presented with three fields.
- FrameNum – The number of frames the sheet contains. In this case it’s 4
- SpritesheetHeight – This is not dimensions and is how many frames high the sheet itself is. My sheets contain 14
- SpritesheetWidth – Again this is not dimensions. Width is how many frames are within a pose row. Each of mine use 4
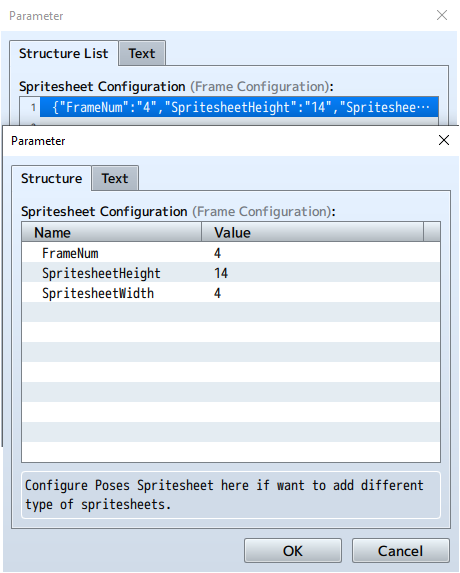
Since this part is now complete there’s no need to change anything in the future and any and all sheets included can be referred back to this set up. It’ll be known as the baseSpritesheet and is linked back to for actors and enemies.
Actor Spritesheet Configuration
The next parameter section we need to look at is for the Actors. From the database for each of your characters you’ll need to tell RPG Maker MZ that they use the same format as we’ve just configured. Just remember for every actor you add you’ll need to create a new parameter for whatever id slot that actor takes up in the database.
When you’re done it’ll look as simple as this:

Actor Poses Configuration
Again this will be a section of setting up and copying per actor in your database.
Here we assign or rather add what poses (based on the spritesheet itself) are. So what you set up will be copied for each actor since they all will use the same number and also the same pose set-up to keep things as simple as possible.

That’s everything for now for the actors, this has told RPG Maker MZ that the actors within the database that they will use this style of animated battler spritesheet and gave them a set number of poses to use within the battle.
However that’s not complete, for now though we need to configure the enemies in almost the same way. Since my actors and enemies use the same sheet style, we need to repeat the process within the enemy sections.
Enemy Spritesheet Configuration
Two parameters down from the actor spritesheet configuration you’ll see one for the enemies, again this is based on what’s in your database. Setting this up has a couple of extra steps, one of which is a nice touch for the end user (you) and can be used elsewhere.
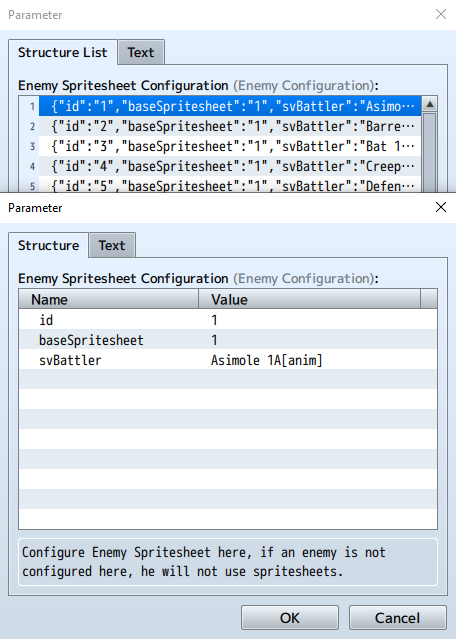
From looking at the complete structure list you’ll see it’s almost exactly the same as the actor structure list. The new parameter is the svBattler. Since my enemies follow the same layout as actors then the baseSpritesheet value is still 1.

The addition of the svBattler gives you the ability to assign what sheet this enemy will use. You’ll need to import the graphic into RPG Maker MZ first within the extension of your project folder directory shown above (…img/sv_enemies)
Click on the button which may state (None) and select your animated battler. In my case I include a code bracket with either [anim] or [single]. We’ll come to how to use [single] next.
Database for Enemies
Within your database tab Enemies you can give your enemy the [single] image file. This will not only let you place your enemies correctly on the battlefield via the Troops tab but can also be used for various things as a bestiary image.

Enemy pose configuration
This configuration is almost the same as the actor pose configuration. Again this will be a section of setting up and copying per enemy in your database.
Here we assign or rather add what poses (based on the spritesheet itself) are. So what you set up will be copied for each enemy since they all will use the same number and also the same pose set-up to keep things as simple as possible.

Quick action values
These quick actions let RPG Maker MZ know what pose action to take on certain situations. Based on my sheets these are the values to set each parameter.

All poses configuration
Here in this section you’ll give a name value to each pose and a bit more information about that pose. Each info parameter is a free section to help organisation. For me however I simply call it Holder to know that it’s configured for my spritesheets.

Let’s click into one to get a breakdown on what’s contained within each pose configuration.

- info – free space to place whatever you like
- name – pose name
- InOut – frame order normal or ping-pong back and forth
- loop – if the pose loops
- frequency – frame speed, lower the number the faster it’ll play
- poseIndex – row number on the spritesheet (0 is the first row)
Entry Actors
This section is for when actors appear on the battle field.

- action – This is the action ID that will be used when entering the battlefield
- offsetX – The X co-ordinates from the starting point
- offsetY – The Y co-ordinates from the starting point
- homeX – A formula of the actors final spot on the X co-ordinate
- homeY – A formula of the actors final spot on the Y co-ordinate
Entry Enemies
This part will manipulate how enemies appear on the battlefield. This is set up so they start from offscreen on the left and move horizontally to their starting place depending on how you’ve placed them in the database Troops tab.

- action – This is the action ID that will be used when entering the battlefield
- offsetX – The X co-ordinates from the starting point
- offsetY – The Y co-ordinates from the starting point
- homeX – Actors only!
- homeY – Actors only!
Akea Visual Weapons
From the main plug in window you should see AkeaVisualWeapons. This part is best done before creating any actions and to make sure that you’ve got what you need.
Within this section there’s only one parameter to set up and it’s a few little steps for each weapon. Just make sure you’ve already got the weapon ready within your database Weapons tab.
Within Weapon Settings you’ll want to set up each weapon depending on it’s placement within the Weapons tab in your database.

Let’s go into number 3 for ID 12 – Bow Level 1A.
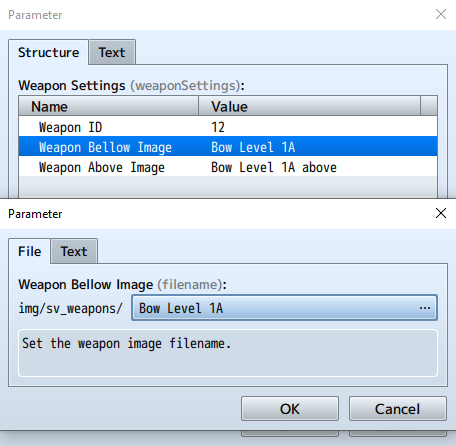
- Weapon ID – This relates to the ID within your database Weapons tab
- Weapon Bellow Image – The image file of the weapon that appears bellow the actor
- Weapon Above Image – The image file of the weapon that appears above the actor
Don’t forget to import your images to RPG Maker MZ first within the …img/sv_weapons/ directory.
All action configuration
This is where the meat of the battle system takes place. First a little explanation of what this is, this is for actors and enemies so referred to as battlers.
Actions are the movement the battlers takes, this can be movements like going towards a character, jumping high, running or walking. Basic playing of animations from your database against a target or on themselves.
- <akeaActions>id: num</akeaActions> : Number of the action,
Ex: <akeaAction>id: 2</akeaActions> to get the second action on the parameters - <akeaActionEnemy>id: num</akeaActionEnemy> : exactly the same as above, but the action will be dealt to the target and not the user.
- <akeaAniTarget>id: number</akeaAniTarget> : Play a, database animation on the target
Ex:<akeaAniTarget>id: 55</akeaAniTarget> : Plays animation id 55 on the Target - <akeaAniSelf>id: number</akeaAniSelf> : Same as above, but on the user
Ex: <akeaAniSelf>id: 55</akeaAniSelf> : Plays animation id 55 on the User - <akeaScript>id: number</akeaScript> : Calls the expression configured on the Script Call parameters:
Ex: <akeaScript>id: 33</akeaScript> : Calls the expression 33 on the parameters - <akeaSkill>id: number</akeaSkill> : Appends skill to the current skill, just be careful to not make loops:
Ex: <akeaSkill>id: 27</akeaSkill> : Calls the skill 27, all animations will be added to the current one - <akeaHit>damage: number</akeaHit> : Calls a damage to the target, this damage is in percent according to the same formula in that skill on the database
Ex: <akeaHit>id: 50</akeaHit> : Calls a hit for aproximately 50% damage of the skill formula - <akeaHitWeapon>damage: damage</akeaHitWeapon> : Same as above, but with weapon animation to the same formula in that skill on the database
Ex: <akeaHitWeapon 30> : Calls a hit for aproximately 30% damage of the skill formula - <akeaHitAll>damage: damage</akeaHitAll> : Same as above, but with all targets
Ex: <akeaHitAll>damage: 50</akeaHitAll> : Calls a hit for aproximately 50% damage of the skill formula - <akeaWait>time: time</akeaWait> : Waits a certain time before the next action, in frames, usually 60 = 1 second
Ex: <akeaWait>time: 60</akeaWait> : Waits 60 frames (1 second) - <akeaRandomize></akeaRandomize> : Randomizes the target, choose random target on the skill and this will change targets in the middle of the Action!
Default action list
This is taken from RPG Maker MZs default pose listing which is 18 poses.
- Walk
- Wait
- Chant
- Guard
- Damage
- Evade
- Thrust
- Swing
- Missile
- Skill
- Spell
- Item
- Escape
- Victory
- Dying
- Abnormal
- Sleep
- Dead
Action basic examples
The first one that will be used most for actors and enemies is the ‘move to target’ action:
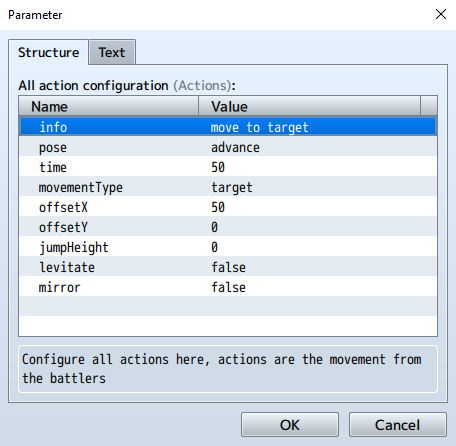
- info – name which can be easily recalled by yourself.
- pose – the default pose action name
- time – how long (in frames) that this action will take
- movementType – a dropdown list which covers various types of movement
-absolute – considers where the battler is
-fromHome – the battlers base
-target – goes to the target
-noMove – this action doesn’t move the battler - offsetX – how much the battler will move on the X co-ordinate
- offsetY – how much the battler will move on the Y co-ordinate
- jumpHeight – height of the jump (0 is no jump)
- levitate – True will have the shadow of the battler stay in place
- mirror – True will mirror the action
This next example is for attacking action.

It’s a shorter action and since the battler is already at its target it doesn’t need to move.
Database Weapons tab settings
That’s a lot to take in but lets look at the Fighters weapon – Knuckle and see how we make them run towards the target and hit them on a basic attack.
This section is done within the Note box for this weapon and can be copied into any other similar weapon.
<akeaActions>
id: move to target
</akeaActions>
<akeaActions>
id: swing attack
</akeaActions>
<akeaAniSelf>
id: 16
</akeaAniSelf>
The first action calls the move to target action and will move the actor holding this weapon in front of the target.
Next it will preform the swing attack action making the character ‘hit’ the target.
Finally it will play the animation ID 16 (From the ID within the Animations tab) on it’s self.
Things to consider
Not every battler would like to move directly in front of their target. Archers may like to stay where they are or move on the horizontal line of where their target is. Something like the example below will explain it:
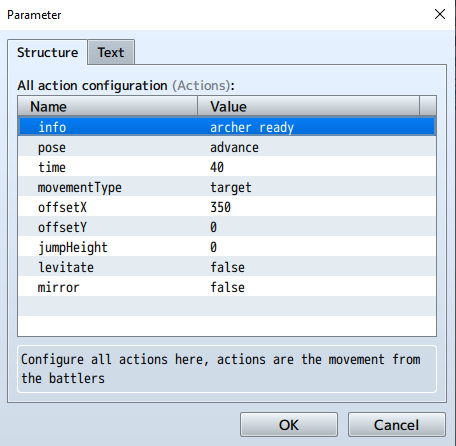
The Archer will move towards the target Y co-ordinate to place them horizontally level with the target but with the offsetX being 350 they’d be a nice distance away from them.
Remember this is the movement action so the pose will be advance! So it shows the character running/walking to that location before any attack action is taken.
You are not limited to how many actions you use. Combine these into the databse Skills tab for some fantastic combos! Here’s an example of how one would look in the skills note box:
<akeaActions>id: 10</akeaActions>
<akeaActions>id: reid prepare</akeaActions>
<akeaAniSelf>id: 7</akeaAniSelf>
<akeaWait>time: 70</akeaWait>
<akeaAniTarget>id: 3</akeaAniTarget>
<akeaHitWeapon>damage:100</akeaHitWeapon>
<akeaActions>id: reid slash 01</akeaActions>
<akeaAniTarget>id: 4</akeaAniTarget>
<akeaHitWeapon>damage:100</akeaHitWeapon>
<akeaActions>id: reid slash 02</akeaActions>
<akeaAniTarget>id: 5</akeaAniTarget>
<akeaHitWeapon>damage:100</akeaHitWeapon>
<akeaActions>id: reid slash 03</akeaActions>
<akeaAniTarget>id: 6</akeaAniTarget>
<akeaWeaponAnim></akeaWeaponAnim>
<akeaActions>id: reid slash 04</akeaActions>
